My new life as a streamer
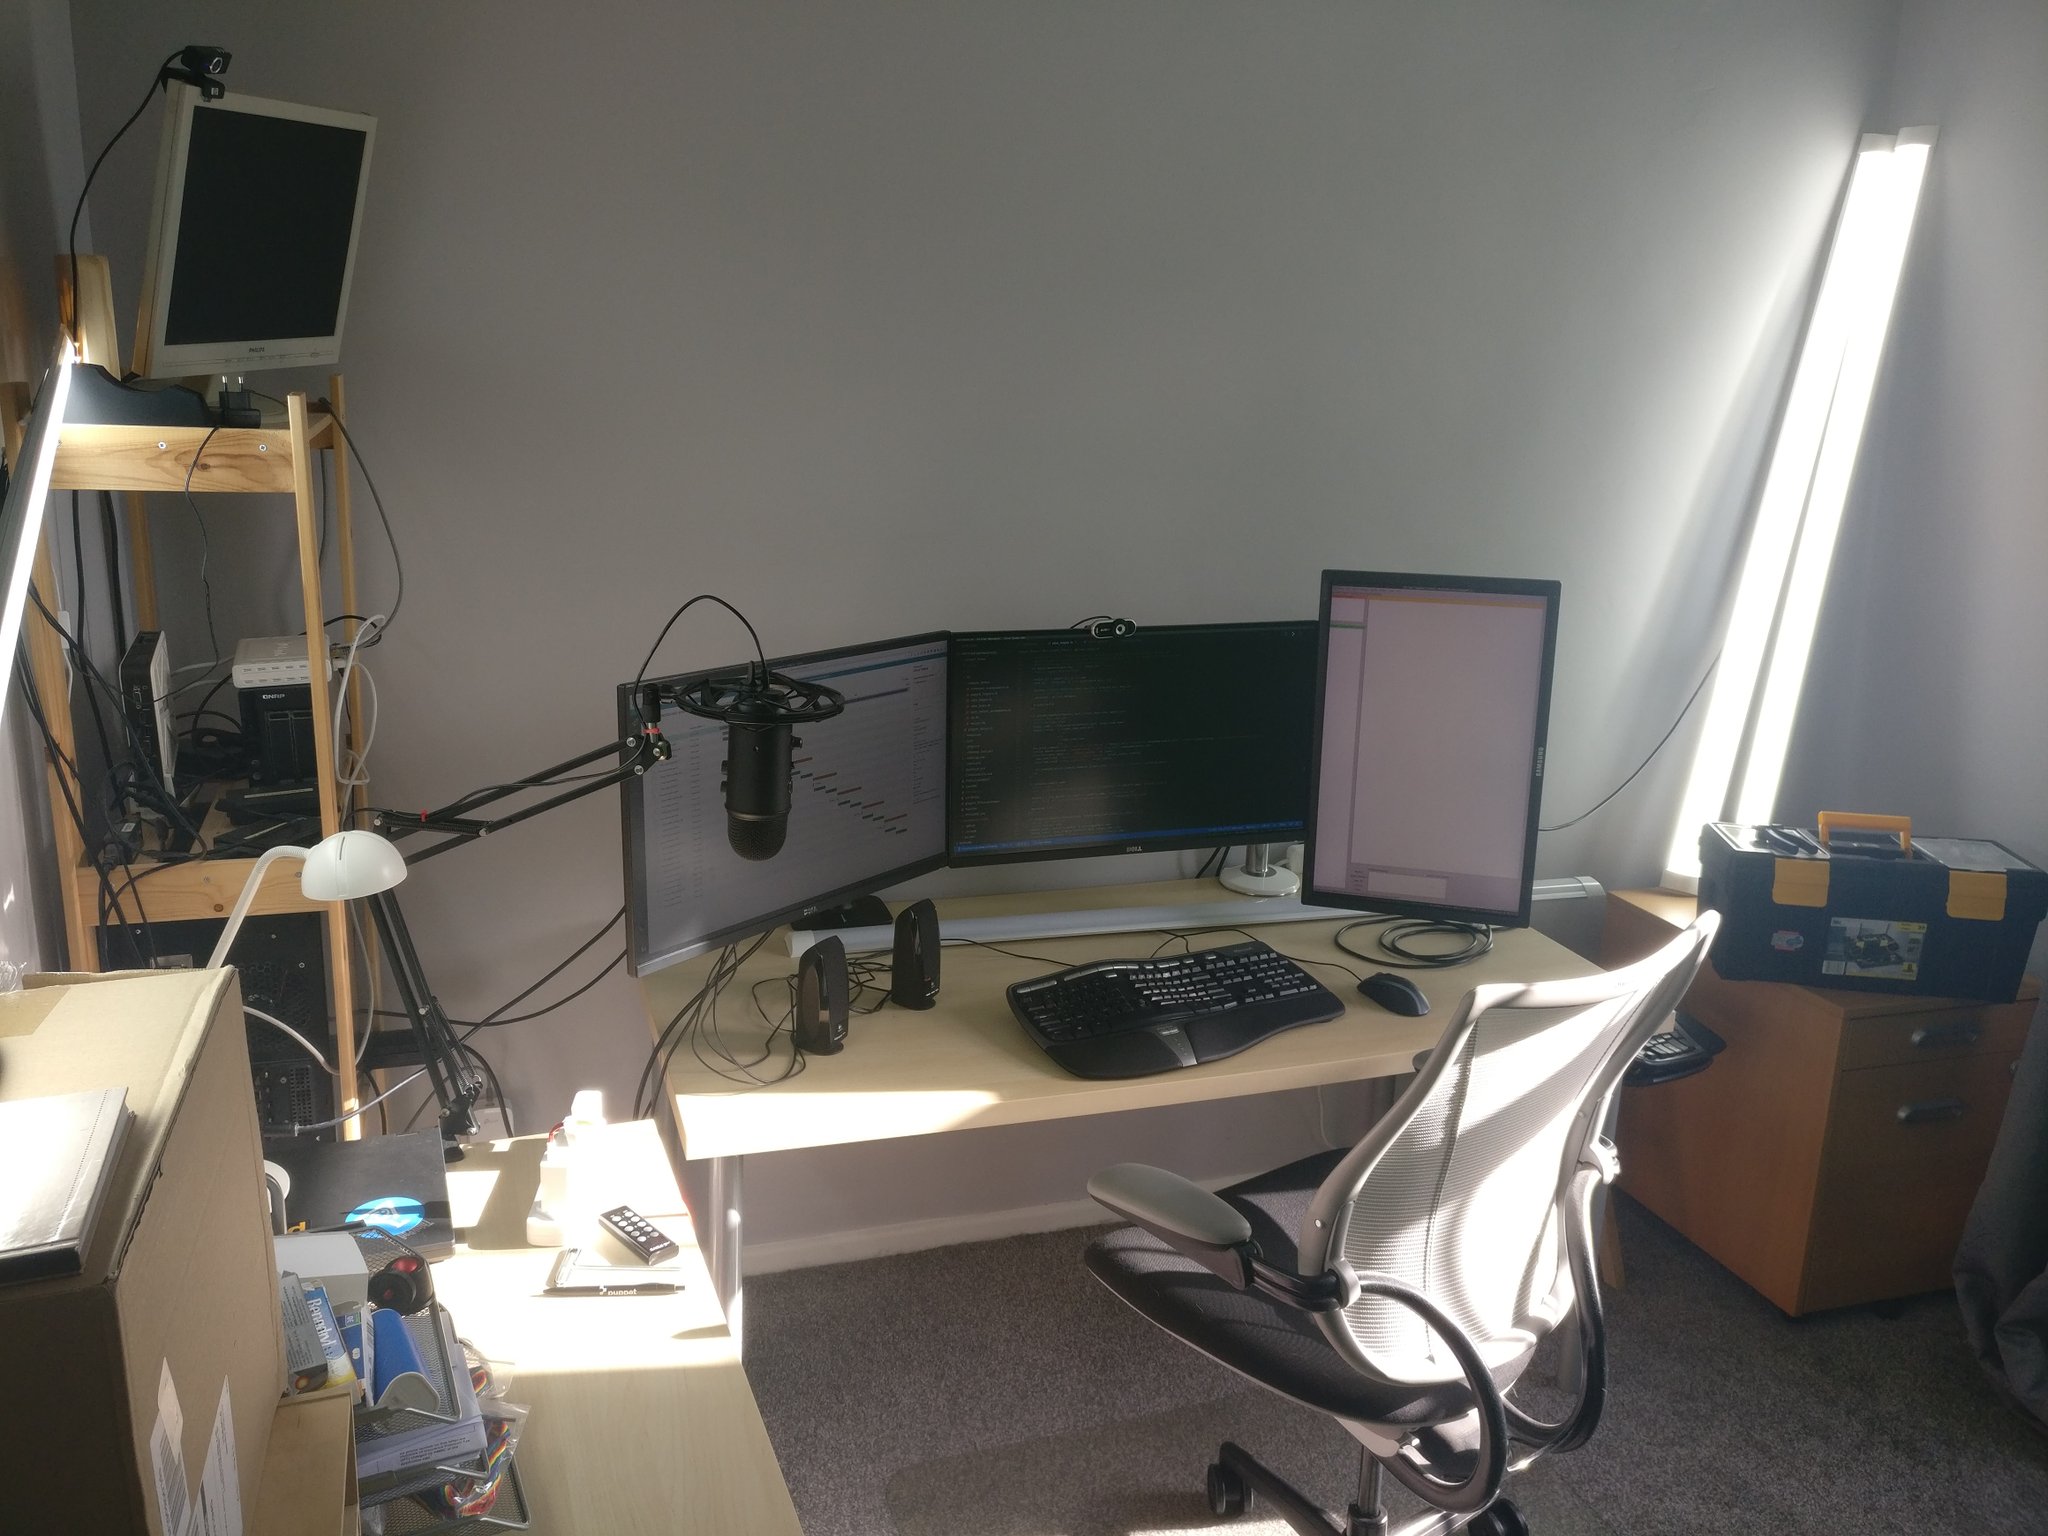
Over the last couple of months I’ve been slowly building out my home office. Between that and the push to even more home office over the next months and Puppet instructing folks to take their chairs and monitors home, I’ve considerably upgraded my working situation at home. This post describes the current statue of the setup, and what works and doesn’t work.
Hardware
This workstation is based on my old development PC from my previous company, dasz.at. Over the years I did upgrade it a bit here and there, but the core is still the old PC from ditech. Here are the specs:
- Intel(R) Core(TM) i7-2600 CPU @ 3.40GHz
- 16 GB RAM
- 750GB SSD (Crucial_CT750MX300SSD1)
- GeForce GTX 1050 Ti (a recent addition)
- 2x Dell UH2715H (27”, 2560x1440, very nice, on loan from Puppet)
- 1x Samsung SyncMaster 2443BW (24”, 1920x1200, not quite as nice with a TN panel)
- 1x Philips 170S (17”, VGA, 1280x1024)
-
the “silent” option of midi cases from ditech - which is really quiet
- HP Deluxe Webcam KQ246AA (1280x1024, on top of the 17” monitor on the shelf for a whole-office overview)
-
A4 TECH HD PC Camera (FullHD, but really strong compression to pipe it over USB2)
- Blue Yeti Microphone
-
the crappiest Logitech USB speakers
- Microsoft Natural Ergonomic Keyboard 4000 v1.0
-
Logitech M500 Corded Mouse
- AmazonBasics Dual Side-by-Side Monitor Display Mounting Arm
-
HumanScale single monitor mounting arm (on loan from Puppet))
- HumanScale chair (a lot more comfortable than the IKEA chair, on loan from Puppet)
For the greenscreen and proper lighting:
- 3x 45W LED bars (6000K)
- 11’ green fabric
- sturdy spring-loaded curtain rod
(I guess as a streamer, I should add affiliate links to all those things; luckily I don’t have to live off of it)
Software
This will be the longer, and hopefully more interesting section. Thanks to the greenscreen and a virtual webcam I can add various flourishes to “boring” meetings.
The entire setup hinges on the OBS Studio. This is a commonly used open source software for streaming and it can ingest, transcode and transmit from a variety of sources to a variety of outputs.
Inputs
Top Cam: this camera is perched at the top of the 17” monitor up on the shelf. Calls where I use this camera also go on the 17” monitor, so I look at the camera when I look at the call. It provides a good overview of my working situation and I like to use this for one-on-ones. Because of the position of the camera and screen I do not “look at the computer” when using it, because I turn away from my main working setup. For casual group hangouts it is useful to show where I currently pay attention by looking at the camera or my monitors.

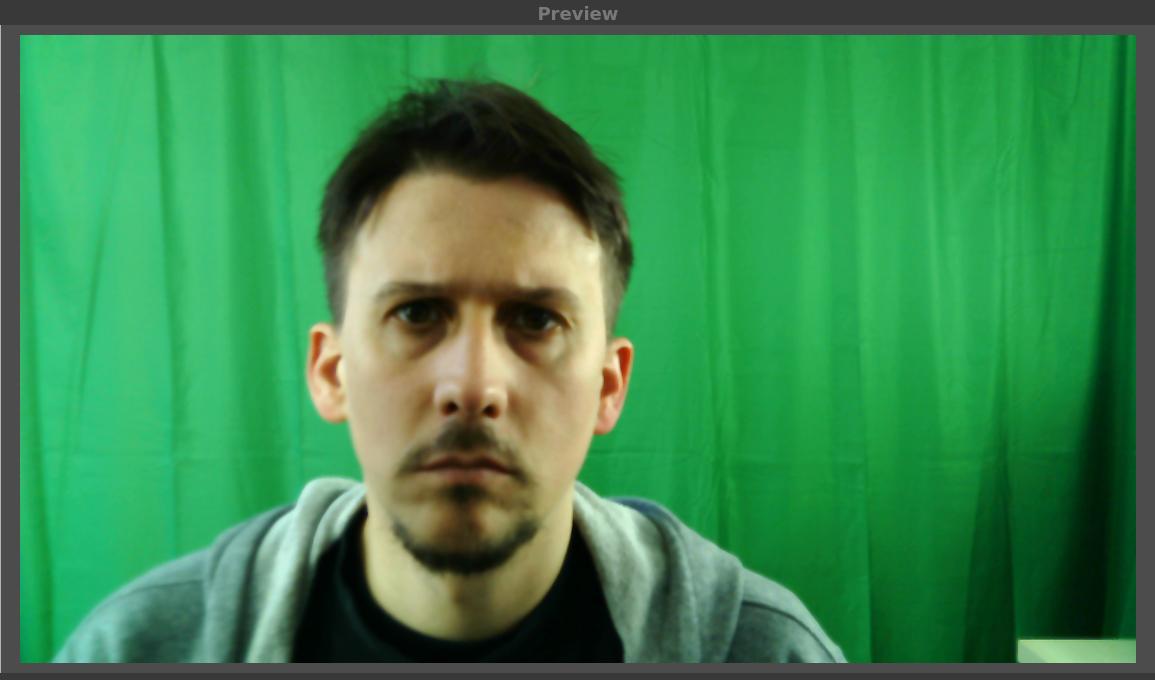
Face Cam: This is a more “regular” angle for things like streaming or team-meetings. Thanks to the greenscreen behind me, I can have all kinds of shenanigans going on behind me.
My current favourite is Flowers - Video Background HD 1080p. It has been incredibly invigorating seeing time and time again, folks reacting with joy and disbelief when I use it in a call.
Media Files: Searching for “fullhd background” on youtube brings a big range of royalty-free (and some paid) backgrounds to put there. Desktop wallpapers are another good source of backgrounds. Of course I also snapped a picture from my webcam without me, so that I can have my regular office background without having to handle the greenscreen.
Applications: Finally OBS can capture applications or entire screens. This is useful to share what I’m working on.
Arrangement
OBS uses the concept of “Scenes” to arrange multiple inputs into a final rendering. I mainly use three scenes:
- Office Overview: is just the Top Cam.
- Presenter Mode: is the Face Cam in full size plastered over a background of my choice.
- Screen Cast: is the common streaming setup of my face cam in the bottom right corner over the contents of my center screen. This way I can share what I’m working on without being too much in the way but still showing up.
Outputs
Depending on the situation I use two different outputs.
For calls, the “V4L2 Video Output” (v4l2sink) plugin provides a virtual webcam that can be used in bluejeans (Puppet’s video conferencing software of choice).
For my brand new twitch channel, I use OBS built-in twitch client.
The latter is surely the more common use-case for OBS in general.
As I’m streaming myself writing this post, OBS is currently upwards of two and a half cores, which is not great. I’ve looked into hardware acceleration, and - in principle - OBS does support that. As it turns out though, there is a bug regarding the bitrate setting on the H/W encoder where any user settings are ignored. This leads to a unusably high-bitrate stream that is rejected by twitch.
I’ve also tried using this setup with skypeforlinux. Microsoft did a fantastic job of absolutely botching their v4l2 implementation. Skype does only accept a single resolution and encoding from the webcam. If the webcam does not provide that, it is not usable in Skype. Loopback devices in V4L2 (which is what the v4l2sink plugin uses under the hood) do not support any mode negotiation or transcoding. Changing the output resolution in OBS is possible, but tedious.
Installing the Plugins
The v4l2loopback kernel module and the OBS v42lsink plugin are not regularly available in Linux distributions. On Debian at least there is v4l2loopback-dkms, which worked fine for me. For everything else, Tom Callaway has a great writeup of how to compile and install at his “Hacking the video stream for BlueJeans on Linux” over on lifejournal. Thanks to Evgeni Golov for making the connection.
Encoding Pitfall
One of the things that OBS (and V4L2) do badly is choosing default video formats on webcams.
The default is YUYV (4:2:2) which is a uncompressed pixelformat that takes up a lot of processing power and limits the framerate of the devices.
I’ve switched all inputs and the virtual webcam to YU12 (Emulated) (or YUV420, which seems to be the same), which leads to a slight loss in color accuracy but allows devices to run at their full resolution and framerate.
qv4l2 was very helpful to inspect the state of the cameras depending on the settings used in OBS.
Multi-Cam Pitfall
One of the gotchas of this setup is that Firefox, Chrome and OBS basically index webcams by activation order (that is, when it was plugged in). This is usually not an issue, as normal people only have a single webcam, which will always be “the first”. As explained above, my workstation has three webcams. Which get loaded all at the same time when it boots. Which basically means they come up in a random order. Which leads to all the programs being very confused about which webcam is which. On top of that, bluejeans in the browser always wants to use the first webcam by default, and goes into a reload loop if it doesn’t get permissions to use it.
To avoid all of those issues, I wrote a short script that forces loading the webcams in the right order:
#!/bin/bash
set -ex

# wait for all cameras to come online
while [ $(ls /dev/video* | wc -l) -lt 5 ]; do ls /dev/video*; sleep 1; done

function manufacturer() { udevadm info -a -n $1 | grep manufacturer | head -n1 | cut -d\" -f2; }
function usbname() { basename $(udevadm trigger -n -v --attr-match=manufacturer="$(manufacturer $1)"); }
function unbind() { echo $1 > /sys/bus/usb/drivers/usb/unbind; }
function bind() { echo $1 > /sys/bus/usb/drivers/usb/bind; }

rmmod v4l2loopback

devices=$(for i in /dev/video* ; do usbname $i; done | sort -u)

for i in $devices; do unbind $i; done

modprobe v4l2loopback

for i in $devices; do bind $i; sleep 1; done
This makes use of relatively harsh unbind/bind cycle which disconnects the devices from the system at the bus level in the kernel. Better than manually unplugging!
After the script has run (I’ve put it into my startup scripts) the webcams are where they are expected and everyone is happy.
Note: the script relies on the USB devices coming up on the same ports, and being able to match based on manufacturer.
Conclusion and remaining Tasks
It took me a while, but I’m pretty pleased with how it turned out, if I may say so myself. I did not expect folks to react so positively to having a weird background on a video call, but it definitely sweetens the deal.
As next steps I still need to properly hang the lights, rather than having them propped up on a shelf. I also hope that this will resolve the final small shadow behind me, that is affecting the greenscreen.
Getting a better webcam for the facecam is also on my wishlist. Proper FullHD USB 3 cameras are not cheap though. And on top of that, it is hard to understand from afar which cameras are actually good. For example, the one A4 one is also advertised as FullHD (and to be fair does return 1920x1080 frames), but really does not come close to actually having that resolution in the picture. You can judge from the screenshot above yourself.